4.17 - Band-stacking VFO/Bands
 ARO Presets |
 BCB Presets |
 Custom Mixed Presets |
|
4.17.1 - Basic use of the VFO bands
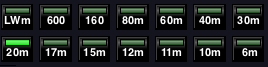
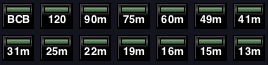
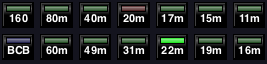
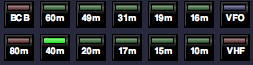
SdrDx offers 14 customizable, bandstacking, band-specialized VFOs.
They are shown above; what they do is, when you are within the band limits each VFO is set for, they will keep track of your tuning, bandwidth, intercept and so on so that if you switch to another band, you can come back to that one and be right where you left off.
So you can click on , tune around the 14 MHz amateur band, click on , tune around the 7 MHz band, then click again on , and you'll be right back where you were when you last were using that VFO.
Each VFO knows its band limits, so if you tune outside them, it won't track your tuning there.
4.17.1.1 - Bandstacking
Each VFO can store a single tuned circumstance, or up to eight. This is called "bandstacking". What this means is that when you select a VFO, there can be multiple separate memories for each one. If you have Bandstack Registers set to 3 in the Band Setup dialog, for instance, the first time you click, the button is . Now, click again, and it is ; you can now tune around again. It will keep track. Now click again, and it's , and yet again, it will keep track. That's all three in the stack. Now click once more, and it turns green again — and you're back where you were when you were tuning around each time. Keep clicking, and you'll see that all three sessions were stored in a different instance of that same VFO.
Each stacking register records center frequency, demodulator frequency, demodulator mode, and demodulator high and low bandpass limits, as well as a large set of other settings you can choose from.
There's a different color for each of the eight possible stacking registers:
4.17.1.2 - Bandstack Registers - Multiple Bandstacking Registers per VFO
Set Bandstack Registers to a number from 1-8. To start with, 3 is suggested; Eight is a lot! Once you get a feel for how all this works, you'll have a better idea what you like. You can change this at any time.
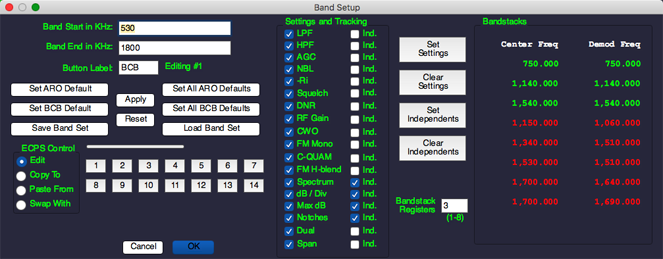
Above is the Band Setup dialog along with the actual VFO / band buttons, just above it. You access this dialog by →Right-click on any of the VFO buttons, shown above the dialog here.
The top left three edit boxes are where you set the band limits and button legend for the selected VFO.
The buttons at the left vertical center of the dialog let you quickly set the VFOs to pre-programmed, commonly-used bands, and also save and load your own custom setups.
The buttons numbered 1-14 at the bottom of the dialog correspond to the VFO buttons by position. #1 is the top left VFO / band button, and #14 is the bottom right VFO / band button. The 1-14 buttons are used to control  Edit , Copy To , Paste From , and Swap With operations.
Under Settings and Tracking are global settings that affect how the VFOs operate overall. The left column of checkmarks control whether the VFO being edited carries the named settings with it; the right set of checkmarks determines if those settings are independent with each bandstacked instance of the VFO, or if a change in the setting to the left of the checkmark will be immediately applied to all of the bandstacks within this VFO.
At the far right under Bandstacks, each of the eight stacking register's center and demodulator frequencies are displayed. If the bandstack is available (controlled by the Bandstack Registers setting), the values will be green. Otherwise, they will be red.
If you Shift- →Left-click any VFO button, it will change to , the first of the bandstacks.
This is how it works:
| Shift- →Left-click = Shift- →Left-click = Shift- →Left-click = Shift- →Left-click = Shift- →Left-click = Shift- →Left-click = Shift- →Left-click = Shift- →Left-click = | Here's one way I use this. I generally have my SDR set for 240 KHz bandwidth when DXing from ELF to HF. This gives me a comfortable viewing width for signals with good resolution. In the AM BCB band, This lets me see a little less than 1/5th of the band at a time with 10 KHz overlap at either end of each segment. So with six bandstacks active, I set the center frequency of each VFO stack to 650.000, 870.000, 1,090.000, 1,310.000, 1,530.000 and 1,590.000 So as I move from the bandstack to the bandstack, I'm panning across the AM BCB band. I change the demod frequency as it strikes my fancy, but leave the center alone. It's a very nice DXing setup. Shift- →Left-click at any point takes me back to the 650.000 center frequency, and I can start at the beginning regardless of where I left off last. |
But wait! There's more! If you Opt- →Left-click a VFO, it will step to the previous bandstack.
 Ind. for any of the settings (at the left of the dialog) that you select for tracking, as this will allow each bandstacked VFO instance to deal with its own set of challenges.
4.17.2 - How Independence Works
As an example, we'll go over Spectrum , which tracks the settings of both I and C.
When Spectrum and the adjacent Ind. are both checked for a particular VFO, adjustments of I and C are tracked by each VFO stacking register independently.
When Spectrum is checked, but Ind. is not checked, adjustments of I and C set all stacking registers within a single VFO at the same time.
If Spectrum is not checked, the VFOs will not set I or C, and the setting of Ind. .
Both Spectrum and Ind. settings apply only to the VFO that is being edited; generally speaking, for normal bands that are a small section of the spectrum such as the 49 meter shortwave band, setting all stacking registers at once for that VFO makes more sense (in other words, don't check the associated Ind. to the right of these settings.) But with a wide frequency range applied to a VFO, Ind. for Spectrum becomes important, because the various stacking registers can be widely separated in frequency, and therefore in base noise level.
For instance, if you set up a VFO for all of your SDR's range which might be 0 KHz to 30 MHz (30,000 KHz), one stacking register might be set to the AM broadcast band, where the noise levels are very high, and so I is at a lowish setting; whereas another stacking register for that same VFO might be set to the 10 meter ham band, where the noise level is very low, and so I is at a fairly high setting. When the two sliders are tracked independently, the stacking registers within each individual VFO remember your adjustments specific to the location you've got them set to.
On the other hand, if you have a VFO set up for a relatively small amount of spectrum, such as 5800 KHz to 6200 KHz for the 49 meter shortwave band, the noise level across the band is likely to be almost exactly the same. If this is how you tend to use the VFOs, you might prefer not to have independent I and C tracking, so that any adjustment of either one is saved in all of the stacking registers at once.
Looking at the dialog, you can see that every trackable setting has an associated Ind. setting; so you can treat each setting as you wish without affecting how the others work. Each VFO has its own group of settings.
Here's another quick example. I have a BCB preset, 530 to 1710 KHz. Generally speaking, the band is consistent, and so almost all of the Ind. boxes are unchecked. This means that whatever I do in one stack is immediately reflected in the others. RF Gain, etc. But I do have a problem with power-line noise in several portions of the band, particularly around 1 MHz. So I have checked Ind. for NBL; that means I can turn it on in one stack, while the other bandstacked NBL settings stay on or off, however they have been previously set.
4.17.3 - Customizing a VFO
If you →Right-click on any one of the VFOs, you can completely customize the band it sets up for. You set the band start and band end, and the label for the button (you should use 3 characters for the label if possible.) If you click  OK, the button will be updated, and now you have a bandstacking-capable VFO for your own customized band limits!
When you customize a VFO, setting the start and end limits, all of the stacking registers will be set to about the middle of the band span, on a 10 KHz frequency interval at, or below, the middle of the band limits you have chosen. In addition, the first (green) stacking register will be selected.
4.17.4 - Edit operation
When the dialog opens, you are in Edit mode for the VFO you right-clicked over, as indicated by the text to the right of the Button Label: edit box. You can change the contents of any or all of the three edit boxes, then hit or OK and the changes will be applied. If you hit , your changes will be discarded.
In edit mode, if you →Left-click one of the buttons ...14 then you will be in edit mode on that button. This allows you to keep the dialog open and edit different buttons.
4.17.5 - Copy To operation
Copy To mode works like this: Click on Copy To , then click on the numbered button that physically corresponds with the button you want the information in the current button copied to; this occurs immediately, and the dialog is returned to Edit mode without changing the button that is being edited.
4.17.6 - Paste From operation
Paste From mode works like this: Click on Paste From , then click on the button you want the information in the selected button copied from; this occurs immediately, and the dialog is returned to Edit mode without changing the button that is being edited, but with the new information for that button set up.
4.17.7 - Swap With operation
Swap With mode works like this: Click on Swap With , then click on the button you want the information in the selected button swapped with; this occurs immediately, and the dialog is returned to Edit mode without changing the button that is being edited, but with the new information for that button set up, and the button chosen for the swap now set to the information that was previously in the currently selected button.
4.17.8 - Reset
discards all your changes to VFOs and places you in the same state you were in when you first opened the dialog.
4.17.9 - Presets
There are two sets of built-in presets. One for amateur radio bands, and one for broadcasting bands.
4.17.9.1 - For one VFO
If you click just this one button will be set to its amateur band default settings.
If you click just this one button will be set to its broadcast band default settings.
4.17.9.2 - For all VFOs
If you click , all of the VFO buttons will be set to the amateur band default settings.
If you click , all of the VFO buttons will be set to the broadcast band default settings.
4.17.10 - Bandsets
Each full set of 14 VFO / band settings is considered a "bandset."
4.17.10.1 - Saving a bandset
Once you have a set of bands configured such that you like the whole group of them, you can use to save them under a custom name.
Don't change the file extension set in the save (or load) file dialog. This helps SdrDx locate just the files you are interested in. You can change it, I just strongly suggest you avoid doing that.
4.17.10.2 - Loading a bandset
Once you have saved a bandset, you can re-load it at any time using — after a load, the stacking register for each VFO is set to green (the first stacking register.)
4.17.11 - Cancel Dialog
Clicking or the window close button ( ) restores all VFOs to the state they were in when you opened the Band Setup dialog. However, if you saved a bandset file while the dialog was open, that file remains in the filesystem as doing so has no effect on SdrDx's subsequent operation.
4.17.12 - Error Correction
If for any reason any of the data or files associated with a VFO or its various stacks become corrupt, internal checking procedures are in place that are intended to return the VFO to a "sane" state.
4.17.13 - Tracked and Trackable Settings
| Setting | Item(s) Tracked | VFO Tracking |
Bandstacking Independent |
|---|---|---|---|
| Bandstacks |
| Yes | No |
| Tuning |
| Yes | Yes |
| Demodulator | Yes | Yes | |
| Low pass filter | Optional | Optional | |
| High pass filter | Optional | Optional | |
| AGC | Optional | Optional | |
| Noise blanker | Optional | Optional | |
| Anti-Ringing | Optional | Optional | |
| Squelch | Optional | Optional | |
| Dynamic Noise Reduction | Optional | Optional | |
| RF Gain | Optional | Optional | |
| CW Offset | Optional | Optional | |
| WFM Monophonic | Optional | Optional | |
| C-QUAM | Optional | Optional | |
| WFM High Blend | Optional | Optional | |
| Spectrum | Optional | Optional | |
| dB / Div |
| Optional | Optional |
| Max dB |
| Optional | Optional |
| Notches | Optional | Optional | |
| Dual* |
| Optional | Optional |
| Span |
| Optional | Optional |
 Low edge of bandpass
 High edge of bandpass
 - Db / Div
 - Max dB
* Antenna gains and antenna phasing are only obeyed by SdrDx when  DUL is on and an SDR is connected that has dual-channel support such as the AFEDRI AFE822. This is set in the dialog.
** Span settings saved in a VFO will be modified if the SDR's sample rate is less than the specified span. For instance, say you had your SDR sampling at 500 KHz, and a span of 400 KHz was saved in a VFO. Later, you change the SDR to a 200 KHz sample rate, and subsequently select that VFO. The span set by that VFO will now be modified downwards to 200 KHz, and so will the saved value in the VFO — the 400 KHz setting is lost. Remember: VFOs are always adjusting themselves to the current circumstances.
| toc | index | guide | changes | keyboard | , previous | . next |