3.2 - New Installs
Under Mac OS X versions with the "App-Nap" feature you must disable "App-Nap" or OS X will "helpfully" put the server to sleep, preventing proper operation. This is accomplished by right- or control-clicking on the server program icon and then selecting "Get Info" from the menu that appears. You should also do this for SdrDx itself or again, when SdrDx is not the front-most application, OS X will incorrectly deny it the CPU power it requires. Unfortunately this OS X "feature" results in fail-by-default for most real-time applications.
As of version 10.10 and 10.11 Mac OS X, extra steps may be required to allow the SDR-14 and SDR-IQ to operate, depending on Apple's bug fix schedule. More:
Chris Smolinski of Black Cat Systems tells us: If you use an SDR-14 or SDR-IQ with Mac OS X 10.10 or 10.11, you may run into issues due to Apples built in FTDI USB port driver, which prevents the FTDI D2XX library from accessing it. Previously you could just unload the driver when you wanted to run your SDR software, but Mac OS X 10.11 El Capitan compounds the problem by making that impossible under normal conditions. This is part of Apples System Integrity Protection (SIP), also known as rootless mode.
SIP prevents any user, even those with system administrator (root) privileges, modifying a number of operating system directories and files.
Unfortunately this also prevents you from stopping the use of Apple's built in FTDI driver, which you must do in order to run applications that use FTDI's D2XX library. In our case, to stop the use of Apple's built in driver, we need to install a codeless kernel extension (kext). This extension claims priority over Apple's built in driver, but doesnt actually do anything, leaving the device available for the D2XX library to access it. It should also work under 10.9 Mavericks, making it unnecessary to unload the Apple kext each time you want to use your SDR.
To disable SIP on Mac OS X 10.11 El Capitan:
- Restart your Mac.
- As soon as you hear the startup chime, hold down Command-R and keep it held down until you see the Apple icon and a progress bar.
- After you have booted into Recovery Mode, select Terminal from the Utilities menu.
- At the prompt type: csrutil disable
- You should see a message saying that SIP was disabled.
- Select Restart from the Apple menu.
If youre running Mac OS X 10.10 Yosemite, you can disable kernel extension code signing:
- Open the Terminal application
- Type the following: kext-dev-mode=1
- Press return and enter your administrator password
- Reboot
The next step is to install a codeless kernel extension. It wont actually do anything, other then prevent the built in Apple FTDI USB port driver from being used with the SDR. You can download unsigned codeless kernel extension (kext) files, along with a copy of the SDR-xx Server app, here:
http://radiohobbyist.org/blog/mypics/SDR_14_IQ_Mac_OSX.zip
Under El Capitan and Yosemite, that kext needs to be installed in /Library/Extensions/
If you need to load an unsigned kext in Mavericks, it should be in /System/Library/Extensions/
For El Capitan and Yosemite, we would type the following at the Terminal prompt (assuming youve cd'd to the directory containing the kext file):
sudo cp -r SDR14USBFTDICodelessKext.kext /Library/Extensions
In Mavericks:
sudo cp -r SDR14USBFTDICodelessKext.kext /System/Library/Extensions
For an SDR-IQ, you would use the file SDRIQUSBFTDICodelessKext.kext instead, as it has a different USB device PID.
You should then be able to plug in your SDR-14 or SDR-IQ, and see it is found by the SDR-xx Server app.
You can then run SdrDx or another SDR app that expects a networked SDR.
3.2.1 - The RTL-SDR
RTL-SDRs are supported under OS X via the...
Black Cat Systems RTL Network Server
...see the CocoaRTLServer2dist.zip file for details.
Once the RTL support software and server have been installed, the RTL stick can be accessed as if it was an actual network SDR. Therefore most of the information below relating to network SDRs is relevant.
Two more things: First, my RTL SDR changes its I/Q balance every time I change frequency; yours may as well. In that case, you'll be pressing Z or  ZE quite a bit. Second, the RTL stick's I/Q balance is so bad, even once corrected, that I recommend that you never demodulate anything where the demodulation envelope crosses the center tune frequency. Instead, set the center tune well above or below what you want to listen to, then put the demodulator well off-center over the signal.
3.2.2 - The Funcube
Make sure your Funcube is plugged into a fast USB port. All USB ports are not equal; particularly on various Macs. If you're not sure, it's worth hitting a search engine with a search for your computer and USB port speeds.
Also make sure you have your antenna screwed to the FCD tightly.
First thing to do after starting SdrDx is →Right-click -- In the dialog that opens, if you're running Windows, set the sample rate to 48000 or less (40000 is nice) or if you're running OS X, set the sample rate to 50000 -- next, make sure  FCDP + is checked if you have a Funcube plus version.
Now →Left-clickOk
→Left-click -- in the dialog that opens, set the FFT size to 2048 points, set the Mouse Click Resolution to 100 Hz and →Left-clickOk. You can make changes to this after starting the Funcube, however when you stop the Funcube, this setting reverts to what it was before you started it. That's why you should do it before you start the Funcube.
→Left-click and the Funcube should start.
Tune to a spot where there is no signal, and →Left-clickZE to reduce the FunCube's I/Q imbalance as much as possible.
Using S- and/or S+ set the span to match what you set the sample rate to. Beginning with SdrDx 2.14p, There's a 48 KHz setting to accommodate the Qt maximum bandwidth for Windows audio input.
Next, set the grid spacing. →Left-clickGS increases the grid spacing; →Right-clickGS decreases it. For a 48 kHz sample rate, you'll want 12 or 24; for 50, you'll probably want 5 or 10. The current setting is indicated at the left end of the topmost status line.
Generally speaking, tune using the center frequency (bottom frequency readout) and then click around the waterfall to select stations. However, read the following tip carefully, please.
My own FunCube Pro plus exhibits an extremely bad I/Q imbalance, such that it makes tuning right at the center, where the I/Q imbalance spike is, quite problematic. So if I want to tune to 1110 kHz, for instance, I set the center frequency to 1100, and the demodulator frequency then at 1110, 10 kHz away from the center spike. That really helps.
You can use →Right-click to set a constant offset from the center frequency, which will be obeyed by the direct frequency entry command, which is initially mapped to ⇑ RETURN
When you're ready to quit, always →Left-click before exiting the program, then wait five seconds or so before you exit the program.
Unless you also have a network-connected SDR, you can skip the rest of this page, as it deals with network-connected SDRs.
It is possible to have both an FCD and a network-based SDR connected and available at the same time.
3.2.3 - Network-based SDR Startup
Step one: if you're planning to use the RFSPACE SDR-IQ SDR, ensure that you have an IP server running, such as SDR-xx under Mac OS X, or the SDRxxserver.exe PC-based IP server. In the case of the RFSPACE SDR-IQ, SdrDx does not talk to the USB port directly and requires an IP server to be running in order to operate properly.
3.2.3.1 - If you have dual Ethernet ports on your computer
One of the downsides of a network-based SDR is that they move a lot of data across your network, and in some cases, this can slow down everything else. But if you have a second Ethernet port, you can connect the SDR there and your main network won't have to deal with the SDR-IQ datastream traffic.
There are three ways to accomplish this, depending on which SDR you are using. There are innumerable ways to go about this for each of the three methods, so I'm just going to describe them generally, and point out that if you're not a technical person, you might want to get a technical friend to help you out with this.
First, if the SDR allows for a static IP configuration, then you just do that, and it should "just work."
Second, if your operating system is able to set up its own DHCP server on the second port, as OS X can, then do that, and set the available IP range there to start and end at the same IP, for instance 192.168.10.100 for both start and end addresses. This way, the SDR will always show up at the same IP, and you won't have to constantly be hunting it down on the network.
Third, get an old DSL modem with a router, or just a router, and again, set the available IP range there to start and end at the same IP, for instance 192.168.10.100 for both start and end addresses. The SDR will always show up at the same IP.
Both options two and three require a little bit of technical know-how to set up; but there should be plenty of help available on the Internet to guide you through configuring your hardware to work like this. This is exactly how I run my various ethernet SDRs; I connect them to the 2nd Ethernet port of my Mac Pro and they interfere not at all with the rest of my network, no matter how much data they are sending to SdrDx.
3.2.3.2 - SDR Setup Dialog
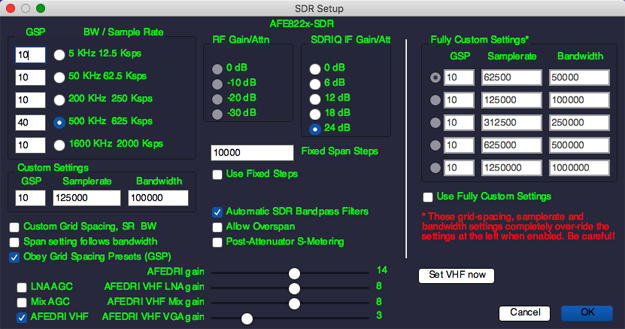
SDR Setup Dialog
Above is the SDR setup dialog, which you access with
The settings on the right of this dialog, Fully Custom Settings, are there for special cases where an SDR is not being set up correctly by the various items on the left of the dialog. This is rare, but it has happened.
if you find that your spectrum display frequency markings do not line up with the actual station positions, odds are that the SDR is not being set up correctly using the usual methods, and you may have to set these values up in order to over-ride those methods completely.
Generally speaking, you'll need to know what values your SDR requires, and that in turn will likely require a discussion with the SDR manufacturer about the SDRs internal clock rate, valid sample rates and the resulting usable bandwidths.
The values here are not checked for correctness (because that's what the items on the left are for... and apparently, that's not working), but instead, are shoved right into the SDR without asking if they are okay or proper. So be very careful. Get these wrong, and you'll be staring at some very confusing results, or simply experience an application crash, and you may have to restart your SDR as well.
AFEDRI VHF , when checked, will allow you to control the VHF gain and AGC settings for the AFE822x SDR. The AFE822x may exhibit apparently random RF gain behaviors in the presence of varying VHF signals. In order to stop this, you turn off LNA AGC and Mix AGC and then set the VHF LNA gain and VHF VGA gain manually. At my QTH, I have them both set to about 70%, while the VGA gain is set to about 30%.
Once you've made the AFEDRI VHF adjustments, you can click and the settings will be sent to the SDR. They are also sent whenever you enable , as long as AFEDRI VHF is checked. If you have pressed , these settings persist even if you cancel the SDR dialog. It takes about 1/2 a second to set all the VHF parameters when the SDR is running.
Post-Attenuator S-Metering , when checked, means that the S-Meter will display the signal level after it has been attenuated. If this is not checked, then the S-Meter display will compensate for the applied attenuation, and show you the signal level at the input of the SDR. This is very likely what you want.
GSP is the Grid Spacing that will be set for the sample rate next to it, if Obey Grid Spacing Presets is checked.
The Custom settings allow you to choose any sample rate, bandwidth, and grid spacing for any bandwidth-agile SDR that you prefer; note, however, that your SDR will only work properly if you feed it sane values, and SdrDx can only place stations correctly when the custom sample rate matches the actual bandwidth of the data the SDR produces. If this is all gibberish to you, just don't use the feature — it is a fairly advanced one. Refer to the documentation for your SDR to see what values will work. The custom grid spacing will be set when Obey Grid Spacing Presets is checked. The Custom setting is only applied if Custom Grid Spacing and SR is checked.
Custom sample rates will not be applied to the SDR-14 or the SDR-IQ. This is because they require more than just a sample rate; they also have custom filters that have to be set up. The good news is that these SDRs already have all the applicable sample rates available as presets.
OK, but in that case, the SDR will have to be stopped, because many of the settings changes would disrupt the data flow from the SDR.If you ask your SDR for a rate it can't run at, it will (might) run at a rate as near to that as it can get; but SdrDx presumes you got the rate you asked for, and so stations will appear on the spectrum in the wrong places.
RF Gain bullets do not apply to all SDRs, but if they are available, selecting one sets the RF gain at the SDR, thereby limiting the signal data that reaches SdrDx. If you are using an AFEDRI SDR, they have a range of settings which are set using the AFEDRI gain slider just below the bullets, instead of the bullets.
The IF gain setting only applies to the RFSPACE SDR-IQ; the same caveat applies though, this setting controls what signal data reaches SdrDx.
Span setting follows bandwidth , if checked, means that when you exit the SDR setup dialog by clicking "OK", the span, which is the amount of spectrum that the RF spectrum and Waterfall will cover, will automatically be set to the same value as the bandwidth setting from this dialog.
Fixed Span Steps overrides SdrDx's auto sizing of span steps. This is particularly useful when you have odd sample rates. This setting is used when Use Fixed Steps is checked.
Allow Overspan controls how far you can extend the span relative to the sample rate of the SDR. For whatever bandwidth you choose, the SDR is set to (at least) 125% of that width for its sample rate. For example, if you choose 100 KHz, the SDR is set to 125 KHz. This provides some extra range that the SDR uses to apply filters outside the range you are interested in, useful because sampling math gets... touchy... near the edges of a sampled spectrum segment, and so signal quality tends to degrade. However, within these edges, there is usually some signal. If you check this option, SdrDx will allow you to open the span all the way to the sampled edges; just be aware that the signals there may be of reduced quality.
Automatic SDR Bandpass Filters This setting, when checked, tells SDRs that have internal hardware filters that select wide sections of spectrum and reject others to automatically choose them as you change center frequency. When it is not checked, the SDR is told not to use those filters at all. This latter condition results in more equal sensitivity at all tunings, but may also render the SDR less sensitive in the presence of strong signals. For instance, a strong local AM station may affect reception in the 49 meter SW Broadcast band with some SDRs.
3.2.4 - USB-based SDR Startup
If you're going to be using a FCD, plug it into a system USB port. If you're just going to be playing back some recordings, no worries, you're all set — skip to step four.
User David Jaksha provides the following narrative about the USB device drivers required for the SDR-xx server that supports the SDR-IQ. It would appear this is no longer required; but if you have problems, you might want to look at this:
http://www.ftdichip.com/Drivers/D2XX.htm
This is an installation from the terminal, so follow the instructions carefully.
However, please note that the paths to install the drivers are not quite correct. See the corrections below. Also, if you have previously installed the ftdichip usbserial drivers, you may need to fully un-install them before the installation of the D2XX drivers will work. All this information is at the link provided above to the www.ftdichip.com site.
Assuming that you have un-installed the ftdichip usbserial drivers, follow the instructions in the text file included with the D2XX drivers.
Download the D2XX1.1.12.dmg file and mount it on your machine. Move the D2XX directory and the LibTable directory to the desktop.
You'll need to copy the commands shown in green and paste them into your Terminal window.
Go to the installation instructions and note the following changes.
1) ok
2) ok
3) ok
4) Note the change in the path for the copy. This is assuming you are running Mac OS X 10.6-10.7. The SDR-xx application will not work on 10.5 or below.
Copy the dylib file to /usr/local/lib
sudo cp ~/Desktop/D2XX/bin/10.5-10.7/libftd2xx.1.1.12.dylib /usr/local/lib/libftd2xx.1.1.12.dylib
5) ok
6) Note the change in the path for the copy.
Copy the D2XX include file
sudo cp ~/Desktop/D2XX/Samples/ftd2xx.h /usr/local/include/ftd2xx.h
7) Note the change in the path for the copy.
Copy the WinTypes include file
sudo cp ~/Desktop/D2XX/Samples/WinTypes.h /usr/local/include/WinTypes.h
After you restart, run SDR-xx. It should come up running, at port 50000, USB device SDR-IQ xxxxxxxxx Running, and connected to the IP address of your Mac.
Start SdrDx and click on at the lower left. Enter the IP number of your Mac in the box, and check that the port is 50000. If the port is different make sure it matches the port on the SDR-xx server.
In SdrDx, →Left-click just to the lift of the signal meter and you should be up an running.
Step two: start the SdrDx program by double-clicking on it. If you're using an RFSPACE SDR, the first time you do this, you'll have to set up the IP address and the port for the SDR server application or the SDR itself using . Don't worry about the sound card input selection for the FUNcube Dongle Pro, if you have one; SdrDx will find the FUNcube Dongle Pro automagically, even if you attach it after you start the program. Again, if you're just going to play back prerecorded files, you're all set and you can skip to step four.
Soundcard-Based SDRs
For the Peaberry and Softrock SDRs, first download and install the PyUSB project then download tcp-to-peaberry.py.zip file, extract it in your home directory.
If you have a soundcard-based SDR such as the Peaberry or SoftRock, →Right-click and make sure Audio I/Q and On are both checked, and see to it that the sample rate of your particular SDR matches that set in the sample rate field (up to 48 KHz under Windows at this time, limits set by Qt, not me.) →Left-clickOk. Next, set the matching sample rate in the dialog. Next, →Left-click to open the sound dialog and make sure that the correct sound input is selected (for example, "Peaberry Radio"), then →Left-clickOk. Pressing OK forces SdrDx to exit; restart and continue.
For AFEDRI and Andrus MK1.5 SDRs, use find SDR in the dialog, then →Left-click and set the desired bandwidth. Note that S+ and S- affect the bandwidth display. Start reception by →Left-click
For Peaberry and softrock, now is the time to run the extracted .py file by typing ./tcp-to-peaberry.py at a shell prompt. This creates a small TCP server that passes on frequency change information to the SDR. Without it running, you cannot tune the SDR.
To receive using such an SDR, →Left-click . To automatically tune such an SDR under SdrDx's command, an external program must be installed that receives SdrDx's TCP broadcasts (specifically the freq and centf emissions) and sets the SDR as the tuning commands are issued. This comprises a general mechanism that allows for the tuning of any SDR, using any method, without having to build support into SdrDx directly.
This mechanism only exists under Windows. In all cases, I am looking for support mechanisms that allow operation under OS X and Windows, with consideration towards future potential linux support. When and if ExtIO_Si570.dll becomes available under OS X and linux as a loadable library (not a DLL, obviously), I may reconsider supporting it, depending on the degree of differences from platform to platform, how well all that is documented, etc.
Why not directly support these SDRs?
Simple: Because there are a lot of them, and each one requires a little bit of effort, and I don't have units to test with, and it simply makes sense to put the load, small as it may be, on the producer of the SDR. I've gone to considerable lengths to make adding support easy, if you know what the SDR needs and you have one to test with.
So, I have (some soundcard-based SDR) and I want it supported. What do I do?
There is a sample Python program provided in the distribution that shows how to catch the TCP frequency messages from (and send messages back to, if desired) SdrDx; all that need be done from there is to implement a method of passing that frequency information on to the specific SDR under the target operating system. Typically this would be nothing more than a tiny command-line program that takes a frequency parameter and sends it out via USB port or ethernet port, etc. You would add this command-line program to the Python sample, and the job is done. Run the script, select the soundcard as input, boom. You can examine the Peaberry support for an example of how to wrap all this up in a single script.
Please contact the maker of the SDR to see if they will author the small program required; please feel free to point them at SdrDx, the sample Python program, and this documentation.
Step three-A, IP address: For RFSPACE SDR use, if the server software is running on the same machine, you can use 127.0.0.1 as the IP address. Otherwise use whatever IP the server machine has been assigned. If you only have a FUNcube Dongle Pro, or you just plan to play back recordings, you don't need a server. Use to set this up.
Step three-B, Port: 50000 is the standard networking port number for this application when talking to RFSPACE units through an IP server — if you have a conflict or otherwise feel you need to, you can alter it at the server, then subsequently match that setting within SdrDx. There's no port setup required for the FUNcube Dongle Pro. Again, →Left-click to set this up.
Step four: Open the audio dialog by →Left-click, and select (most likely) Line Out or whatever you wish to use. Pressing OK forces SdrDx to exit; this is normal. Restart and continue.
Step five: →Right-click and choose where you want your recording files to go, if and when you eventually choose to record something. You can also set a maximum size for such files here; the default is 500 MB, which is generally fine if you have no objection. Select OK to close this dialog.
Step six: →Right-click and choose where you want your saved waterfall images to be stored.
Step seven: If you have an RFSPACE SDR connected to a server, you should now see — If it is instead, and you're trying to get an RFSPACE SDR to work, you have a problem of some kind still to resolve, and you need to go back to step one now. Otherwise, →Left-click
If you have neither an RFSPACE SDR or the FUNcube Dongle, but are trying to play back a recorded spectrum file, →Left-click > instead, then locate and select the recording.
At this point, you should see the waterfall scroll down and a green trace in the signal display area indicating what frequencies have activity on them. You should also hear some noise, unless , or VOL (or your computer's master volume setting) is too low, or one of the squelches is active.
You're up and running. Now to learn all the ins and outs of this fairly complicated radio software. Read on...
| toc | index | guide | changes | keyboard | , previous | . next |